EMV Chip + PIN, EMV Software
DEPLOYING THE EMV-BYPASS CLONING USING THE “VISA-CARD” IN 2022
How are you, hustlers? Are you having a good time? We have got over 500 PLUS requests for a Step-by-step knob-friendly EMV guide/tutorial so today we have decided to grant your wish so you can stop flooding our inbox with the same requests over and over and for those of you who are struggling with EMV cloning, we will discuss a lot of good things today in our post below called “Deploying the EMV Cloning in 2022″ so just hang tight.
Our article details a method of bypassing “EMV chip and pin technology” to monetize supposedly secure cards.
Those of you who just bought “Java-based cards J2A040” will notice that your cards will come unfused which you must fuse by initializing them, if you don’t know how to do that please read the article:
THIS IS HOW TO INITIALIZE UNFUSED JAVA JCOP21 J2A040 CARD IN 2022
This method, EMV-Bypass Cloning 2021, leverages information from one technology (EMV chips) and converts it onto another java based card such as “J2A040”, which allows “EMV Cloning Hustlers” to successfully clone any EMV based Visa/Master Card as well as dumps as long as you have the correct complete information of that Dump.
We also sell RAW dumps data, you don’t have to buy a physical card, we can provide you with DUMP + PIN in a raw form that you can write yourself.
To test this theory, we picked 3 cards from 3 banks in the US (we are experts in that) Besides that we also picked the UK and German cards for testing purposes.
We harvested data from all three cards, created cloned “J2A040” cards with that data, and successfully took out the money from the ATM/Cashpoint, are you surprised? Well, don’t be!
This technique is already in use for some time by serious EMV cloning players. EMV technology may have changed the underground market for CP (card present) records, but EMV-Bypass Cloning has opened the door for EMV Cloning Hustlers to sidestep the central security features of EMV chips and channel a new source of CP (card present) cards back into the underground CP (card present) market.
EMV-Bypass Cloning is rewardingly effective, but through policy review and higher verification standards, card providers and financial institutions are moving but not moving fast enough to completely close in the security gaps that this method exploits as there is always be a way to exploit high-tech security standards, it’s only a matter of time before the serious hustles get to it, its always been like this and it will remain that way in the future.
HISTORY
The invention of the EMV chip was once considered the most significant development in secure payment card technology. While payment cards had previously relied on the magnetic stripe (magstripe) to store information our cloning guys had been cracking that technology and cloning the cards for years.
To prevent our EMV cloning guys from placing purchases with cloned payment cards, they introduced the EMV chips to encrypt their payment card data and the CVV (called iCVV for EMV-enabled cards).
With the EMV a new encryption key (also called a token or cryptogram) gets generated upon each purchase for CP (card present) transactions. This so-called token gets generated due to the interaction between the EMV chip and the card reader (POS) and applies ONLY to that particular single transaction.
So since the same token cannot be used for additional transactions so stealing that token is pointless to be able to use that on a cloned EMV-enabled card.
There is currently no compelling evidence that any of our cloning hustlers have discovered a method of coping that encryption key (token or cryptogram) to make purchases involving EMV technology.
EMV chips did indeed transformed the underground payment card economy, shifting most illicit markets towards Card Not Present (CNP) records; merchant compliance with regulations mandating EMV chip transactions correlates strongly with the presence of CP fraud in any given country.
However, our underbelly hustlers have already found a way to bypass EMV technology and monetize these supposedly secure EMV cards by using programs such as:
- X2 Smartcard + Full Settings Package ($199)
- X2 2020 EMV Smartcard All In One ($299)
- EMV Chip Writing Software V8.6 ($199)
Our in-depth report here details a method of acquiring enough data through donor EMV Visa/Mastercard to clone a payment card using X2 2020 EMV Smartcard All In One this method leverages information from EMV chips and converts it into other Java-based J2A040 cards which allows the cloning hustlers to copy an exact “1-on-1 copy” of the doner EMV card.
These Java-based J2A040 cards are available in our shop, you will also need the following to format and write the new card.
- JCOP English ($99)
The hardware you will require to undertake the operation is:
- ARC38
- MCR200
- OmniKey3021
- OmniKey3121
- OmniKey5025
- OmniKey5421
Any one of the above hardware will do just fine, however, we have MCR200, and it’s our favorite.
So Once you have all the tech we mentioned above in order, this is what you will do, this EMV cloning technique below is written exclusively by our team you will NOT find this anywhere on the surface web or the dark web for free, so let’s get started:
========================================
STEPS TO FORMAT JAVA WHITE CARD USING JCOP ENGLISH
========================================
#1. First open the “JCOP English” program.
#2. Inserted your “Java Card J2A040” in your “MCR200”
#3. Pressed “Delete JCOP Files” (it deletes the files)
#4. Under “Script Type” select “Debit”
#5. As a final step click on “Format JCOP Chip” (it formates it)
#6. Once done take out the “Java Card J2A040”
——-Format is now DONE! ———

=========================================
STEPS TO PRODUCE A CLONED J2A040 CARD USING X2 2020
=========================================
#1. Open the X2 2020 and click on the “IST Generate” option (top left).
#2. Click on the “Read Card” button (middle bottom).
#3. From the details that appear on the screen “Copy Track 2 Data.”
#4. Click on the “EMV” option (located top left).
#5. Paste that “Track 2” data and replace “D” located in the middle of “Track 2” with “=”
#6. Insert “Card Holders Name” in its field it should be in “LAST NAME FIRST NAME” format (insert capital letters).
#7. In “Application Label Field” insert “Card type” in our case it’s “VISA DEBIT” (insert capital letters).
#8. In “Track 1 Discretion Data” you checkmark the box first then delete the “Default Value” that gets generated, then click on the “IST Generate” tab to copy “Track 1” then go back to the “EMV” tab and insert “Track 1” in its field there.
#9. In the “Credit” field select your card type select “VISA” as our card was VISA (make sure to check track 1 again as changing the value in this section will replace Track 1 with a default value, so if that happens just replace that default value with Track 1 again) and in “Writer” field is “MCR200” as our hardware is MCR200.
#10. In “AID” for “VISA” it’s “31010” for master it’s going to be “41010” so we typed “31010”
#11. In “Country Code” insert your country code, ours is “0840” for the US.
#12. In the “PIN” box insert your “Card/Dump Pin”
#13. In “Currency Code” insert your “Card/Dump Currency Code” for USD its “0840”
#14. In the “ARQC” section just “ignore that” for now.
#15. For “Pref Name” we can leave that “as it is” for now.
#16. For “Effective Date” click on the “Change Data” checkmark and then see the “Expiry Date” and Reverse it 4 years so for example if the expiry date of the card/dump is 28/02/2022 the “Effective Date” AKA Issue Date would be 28/02/2018 and you will insert it in “YYMMDD” format like “180228” inside “Effective Date”
#17. For “Expiration Date” check the “IST Generate” tab and then see the “Expiry Date” on that page for example if the expiry date of the card/dump is 28/02/2022 you will go back to the “EMV tab” and insert it in “YYMMDD” format like “220228”
#18. Now take out the “Original Donor Card” and insert the “Java White Card” to clone in your “MCR200” hardware.
#19. Now it’s time to burn the “White Java Card” by clicking on the “Credit” button located at the bottom right.
#20. You will see once you click “Credit” the “MCR200” will start writing and once done it will say “Completed Job.”
#21. Leave everything as it is!
——— CONGRATS HALF OF THE WORK IS DONE! ———
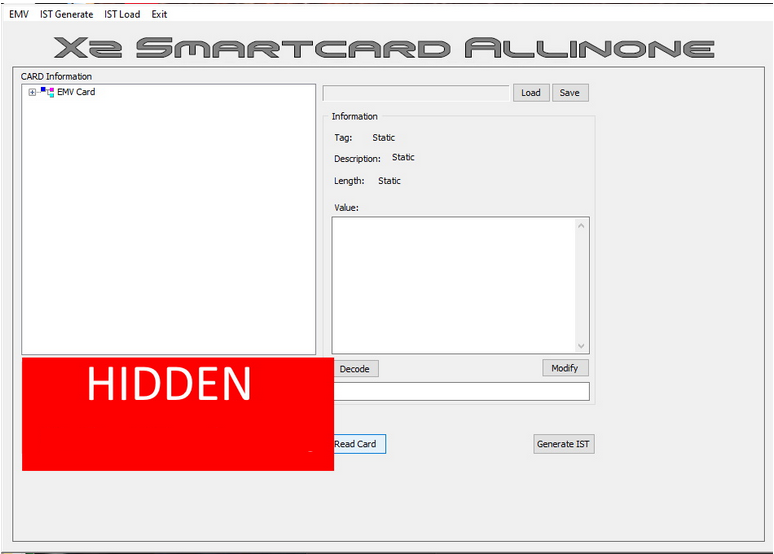
#22. Click on the “IST Generate” tab and then click on the “Read Card” button at the bottom.
#23. You must see the same data as you did when you inserted the “Original Donor Card” and clicked on “Read Card” in “Step 1 and 2” and if you see the same info then congrats, let’s get to the next step.
#24. Now go to the “IST Generate” tab you see on top and click on the “Save” button that you see top right beside the “load” button, it will ask you to save that file with the “ZLD” extension so save it at the desktop with whatever name you like, Now you will click on “load” button and browse this file that you just saved with “ZLD” extension and it will say “Successfully Loaded Tree data from a file.”
#25. Now on the same “IST Generate” page, it’s time to click on the “Generate IST” button that you see at the bottom and save that with whatever name, it will save with extension “IST” we will need this file later in step “35 below”.
#26. Now go to “EMV tab” and copy “Track 2” then go back in “IST Load” and paste that “Track 2” in there, you do NOT need to fill in any other details on this page.
#27. Now you will open “BP tools Cryptographic Calculator”
#28. In the top tabs of this “Bp Tools Cryptographic Calculator,” you will see the “EMV” tab click on it and select “Application Cryptograms” then select “EMV 4.2” and you will see you will end up on a screen with “UDK” tab selected.
#29. Now you will see options boxes for “MDK” “PAN” and “PAN Seq Nr” you will also see “UDK Derivation Option” with “Option A” and “Key Parity” with “Odd” Selected.
#30. The only thing you need to change on this screen is “PAN” which obviously stands for “Primary Account Number” and you will get that from your “Track 2” so see the first 16 digit number that is also the “16 Digit Card Number.”
#31. Go back to X2 2020 and in the “EMV tab” you will see the “first 16 digits of the card number” copy them and now go to the “BP tools calculator” to replace the default PAN number with “Your own PAN number” leave everything as default.
#32. Now you will click on the “Green Padlock” and you will see that will add “MDK” and “UDK” inside the “output screen” on the right side.
#33. Then you will click on the next tab called “Common Session Key” and without changing anything “Click the padlock” this will add more data such as “Common Session Key Derivation” and other keys in our “Output Screen”
#34. Then click on the second last tab called “AAC/ARQC/TC” and hit the “Green Padlock” now this is the last step to get what we are looking for see the bottom of your “Output Screen” and you will see the “AC Generated Number” and that’s the ARQC we are looking for, so copy that number and close this “BP tool” as all the work for this is done.
#35. Go back to X2 2020 in the “IST Load” tab and paste that “Ac Generated Number” from BP tools inside the “ARQC 1” box, now its time to browse the file that you saved with the “IST” extension in “Step 25” above by clicking the “Open” button.
#36. Once you have the “IST File Path” + Track 2 + ARQC 1″ on this page it’s time to click on the “Burn” button.
#37. Once you have done everything right you will see the “Completed Job” popup.
#38. The “Java White Card” is now written and ready to go!
——— ALL IS NOW DONE!! ———
CONCLUSION
Whether you are a newbie in the EMV cloning business or an expert looking to cashout using DUMPS +PIN we have something to offer for both newbies as well as experienced hustlers, we never resell or recycle information we serve several hundred customers each week and have been doing so for quite some time now.
At the start, EMV tech looks like a complex task as many would call it a “Rocket Science” project but that is to be expected with anything you are not familiar with, we are always here to assist you with it in case of a problem. If you have bought the software or set it up and you still need a step-by-step video you can let our support know your order number and we will send you a video explaining from start-up to all the way to the ATM withdrawal.
THIS IS HOW TO INITIALIZE UNFUSED JAVA JCOP21 J2A040 CARD IN 2022
SERVICE CODES
The value of the service code (101, 201, 203, etc…) determines where the cards are suitable to use and in what way.
4802394718492472=141210111009248 – bold section is the service code on a dump.
The first digit (Usage Variables):
– 1xx: Worldwide use, usually doesn’t have a smart chip.
– 2xx: Worldwide use, does have a smart chip and required to use smart chip if the card reader reads the chip
– 5xx: National use, a list of regions can be allowed by the bank (often called region locks).
– 6xx: National use, a list of regions can be allowed by the bank but required to use smart chip if the card reader reads the chip
– 7xx: Only useable according to what has been agreed with the bank
The second digit (Authorization):
– x0x: Normal authorization, normal usage.
– x2x: Contact issuing bank.
– x4x: Contact issuing bank, exceptions rules by the bank.
The third digit (Services that the card can be used for):
– xx0: Can be used for anything, require a PIN.
– xx1: Can be used for anything without a PIN.
– xx2: Can be used to buy goods or pay a service, cannot retrieve cash, PIN not required.
– xx3: ATM only, PIN required.
– xx4: Cash only, PIN not required.
– xx5: Can be used to buy goods or pay a service, cannot retrieve cash. PIN required
– xx6: No restrictions to use, will ask for a PIN when possible.
– xx7: Can be used to buy goods or pay a service, cannot retrieve cash. PIN required when possible.
Good Luck, see you on the other side!


